IWebHostEnvironment 인터페이스를 사용하면 파일의 경로를 얻을 수 있습니다.

WebRootPath, ContentRootPath 2개의 경로를 얻을 수 있습니다.


두 경로의 차이는 아래와 같습니다.

WebRootPath - www 파일의 경로

ContentRootPath - 최상위의 경로


WebRootPath 와 ContentRootPath  차이


사용법

using Microsoft.AspNetCore.Hosting;

namespace HostEnvironmentSample.Controllers
{
	public class HomeController : Controller
	{
		private IWebHostEnvironment _hostEnvironment;

		public HomeController(IWebHostEnvironment hostEnvironment)
		{
			_hostEnvironment = hostEnvironment;
		}

		public string Index()
		{
			string wwwPath = _hostEnvironment.WebRootPath;
			string contentPath = _hostEnvironment.ContentRootPath;
			return "WebRootPath :"+wwwPath + "\n\nContentRootPath " + contentPath;
		}
	}
}


ASP.NET 2.0에선 IHostingEnvironment 인터페이스 입니다.

IHostingEnvironment 인터페이스는 더 이상 지원하지 않는다고 합니다.

PVA(Power Virtual Agent)란?

PAV 설명

개요 문서에서 캡쳐한 사진입니다.

아직 PVA가 나온지 오래되지 않아서 기존 bot framework에서 사용하던 기술들을 다 사용할 수 없습니다.

예를 들면 Adaptive Card를 사용할 수 없습니다.(Teams에서는 사용 가능합니다.)


샘플 만들어보기

만드는건 별로 어렵지 않기 때문에 넘어가겠습니다.

여기를 참고 하시면 됩니다.

주의 하실점은 개인 계정으로는 로그인이 안됩니다. 회사로 등록한 계정만 무료체험이 가능합니다.


웹 사이트에 연동

web site에 띄우는 방법은 2가지가 있습니다.


1.iframe 

PVA 사이트에서 관리->채널->사용자 지정 웹 사이트를 클릭해줍니다.

클릭하면 아래 이미지가 나오는데 iframe 영역만 해당 소스 위치에 추가 해주면 됩니다.


2.코드로

!DOCTYPE html>
<html>
<head>
    <title>Contoso Sample Web Chat</title> 
    <!-- This styling is for the Web Chat demonstration purposes. It is recommended that style is moved to separate file for organization in larger projects -->
    <style>
        html, body {
            height: 100%;
        }

        body {
            margin: 0;
        }

        h1 {
            font-size: 16px;
            font-family: Segoe UI;
            line-height: 20px;
            color: whitesmoke;
            display: table-cell;
            padding: 13px 0px 0px 20px;
        }

        #heading {
            background-color: black;
            height: 50px;
        }

        .main {
            margin: 18px;
            border-radius: 4px;
        }

        div[role="form"]{
            background-color: black;
        }

        #webchat {
            position: fixed;
            height: calc(100% - 50px);
            width: 100%;
            top: 50px;
            overflow: hidden;
        }

    </style>

</head>
<body>
    <div>
        <div id="heading">
            <!-- Change the h1 text to change the bot name -->    
            <h1>Contoso Bot Name</h1>
        </div>
        <div id="webchat" role="main"></div>
    </div>    

  <script src="https://cdn.botframework.com/botframework-webchat/latest/webchat.js"></script>

  <script>
        const styleOptions = {

           // Add styleOptions to customize Web Chat canvas
           hideUploadButton: true
        };

        // Add your BOT ID below 
        var BOT_ID = "자기의 BotId"; 
        var theURL = "https://powerva.microsoft.com/api/botmanagement/v1/directline/directlinetoken?botId=" + BOT_ID;

      fetch(theURL)
            .then(response => response.json())
            .then(conversationInfo => {
                window.WebChat.renderWebChat(
                    {
                        directLine: window.WebChat.createDirectLine({
                            token: conversationInfo.token,
                        }),
                        styleOptions
                    },
                    document.getElementById('webchat')
                );
            })
            .catch(err => console.error("An error occurred: " + err));

    </script>
  </body>
</html>

style, <div id='webchat' role='main'></div>,script 코드로 원하는 페이지 코드에 추가 하시면 됩니다.

자세한 내용은 여기에서 참고하시면 됩니다.

참고로 BotId는 1번의 이미지에서 검은색로 안보이게 한 부분이 BotId 입니다.


1번과 2번의 차이점을 설명하면 디자인 수정 차이입니다.

1번은 MS에서 제공하는 디자인 그대로 사용할 수 밖에 없고 2번은 css를 추가해서 수정할 수 있습니다.


근데 여기서 문제가 있습니다. PVA는 IE를 지원하지 않는다고 나옵니다.

따라서 저 코드를 쓰게되면 IE에서는 사용할 수 없습니다.

IE를 사용하기 위해서는 코드를 수정해줘야합니다. IE 11버전만 지원이 가능힙니다.

<style>
	.main {
        margin: 18px;
        border-radius: 4px;
    }

    div[role="form"]{
        background-color: black;
    }
    div[role="log"]{
        background: gainsboro;
    }
    div[role="status"]{
        background: darkgray;
    }

    #webchat {
        position: fixed;
        height: calc(100% - 135px);
        z-index: 9999;
        width: 400px;
        top: 132px;
        overflow: hidden;
    }
</style>

<div class="container" style="order: 3; position: relative; width: 400px; min-width: 400px; height: 100%;">
	<div>
    	<div role="main"></div>
    </div>
    <script src="https://cdn.botframework.com/botframework-webchat/latest/webchat-es5.js"></script>
    <script>
    	document.querySelectorAll('[role="main"]')[0].setAttribute("id", "webchat");
          const styleOptions = {
            // Add styleOptions to customize web chat canvas
            hideUploadButton: true,
          };

          var BOT_ID = "사용자 BotId";
          var theURL = "https://powerva.microsoft.com/api/botmanagement/v1/directline/directlinetoken?botId=" + BOT_ID;
          fetch(theURL)
          	.then(function(res) {
          		return res.json();
          })
          .then(function(json) {
          	const token = json.token;
			window.WebChat.renderWebChat(
			{
				directLine: window.WebChat.createDirectLine({
					token: token
                })
            },
            document.getElementById('webchat')
            );

			document.querySelector('#webchat > *').focus();
			});
		</script>
</div>
                 

위의 코드로 바꿔주면 됩니다.


위에 사진은 실제로 적용한 캡쳐본이고 시나리오는 기본 토픽입니다.


PVA에 대해 개인적인 생각은 현재로서는 단순 질문과 답변에는 적합하지만, 그 이상이 되면 PVA만 사용해서 이용은 힘들거 같단 생각이 듭니다. 

BotFramework, Power Automate 등 여러가지를 써야지 실제로 사용 가능한 Chatbot이 되지 않을까 싶습니다.


MS SQL에서 중국어를 그냥 Insert, Update 하면 글자가 깨져서 들어가는 현상을 볼수있습니다.


그럴경우 N을 넣으면 됩니다.


예를 들면 아래와 같이 사용하면 됩니다.

insert into TB_TEMP values('중국어 테스트',N'港龙');

'프로그래밍 > MS SQL' 카테고리의 다른 글

[MS SQL] 문자형식을 숫자처럼 정렬하기  (0) 2019.07.16

MS SQL에서 1,2,3,4 같이 숫자 데이터지만 문자 형식으로 저장되어 있는 경우 정렬할때

10,1,20,2 이런 형식으로 나온다.


이럴 경우 쓰는 방법은 아래와 같다.


SELECT * FROM 테이블명 ORDER BY LEN(컬럼명) DESC, 컬럼명 DESC


'프로그래밍 > MS SQL' 카테고리의 다른 글

[MS SQL] 중국어 글자 깨짐 현상  (0) 2019.12.04

SQL로 페이징 할때 키워드 검색 해야되는 경우 테이블의 컬럼명이 필요할때가 있습니다.

그럴경우 return 되는 변수를 통해 간단히 Foreach로 코드를 만들 수 있습니다.

private async Task<List<string>> GetTableColumns(string tableNm)
{
	string query = $"SELECT COLUMN_NAME FROM INFORMATION_SCHEMA.COLUMNS WHERE TABLE_NAME = '{tableNm}'";
    var columns = new List<string>();
    using (var dbconn = new SqlConnection(_context.ConnectionString))
    {
    	dbconn.Open();
        try
        {
        	using (var cmd = new SqlCommand(query, dbconn))
            {
            	using (var reader = cmd.ExecuteReader())
                {
                	while (reader.Read())
                    {
                    	columns.Add(reader.GetString(0));
                    }
                 }
   			}
     	}
     	catch (Exception ex)
     	{
     		_logger.Log(ex);
     	}
    }
	return columns;
}

'프로그래밍 > C# And .Net' 카테고리의 다른 글

[.NET] ASP.NET 3.1 경로 얻기  (0) 2020.12.24


1.Google 프로젝트 생성


https://console.developers.google.com


Google Cloud Platform

하나의 계정으로 모든 Google 서비스를 Google Cloud Platform을 사용하려면 로그인하세요.

accounts.google.com

1-1)로그인해서 접속시 프로젝트가 없는 경우는 프로젝트를 생성해야 합니다.

아래 사진과 같이 맨 오른쪽에 만들기 버튼이 있습니다. 


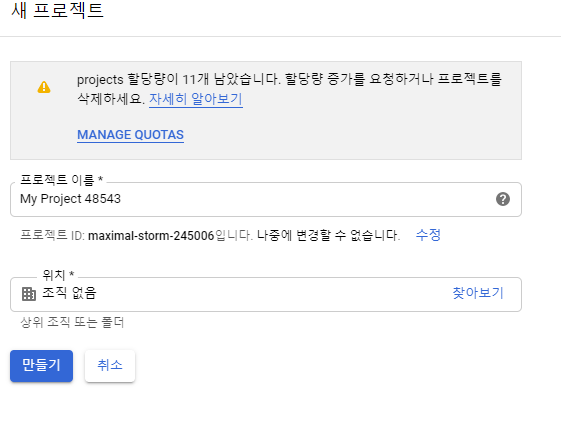
1-2)아래 사진처럼 프로젝트 이름을 알맞게 쓰고 만들기 버튼을 클릭해서 만들어 줍니다.

1-3)만들기 버튼을 누르시면 아래 사진과 같이 나오는데 빨간색 버튼의 'API 및 서비스 사용 설정'을 클릭해 줍니다.

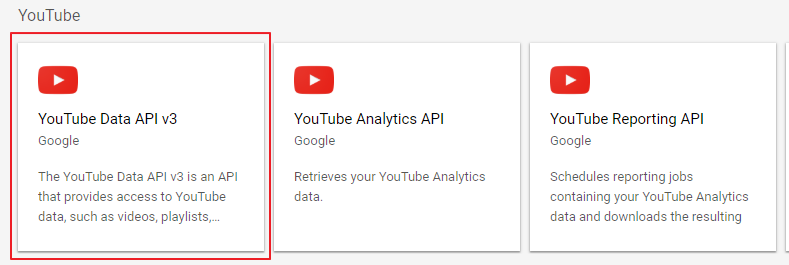
1-4)아래 사진의 YouTube Data API v3를 선택합니다.
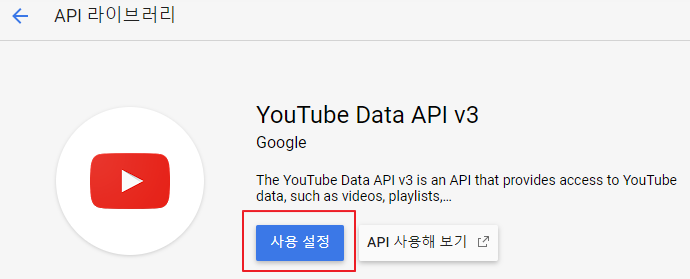
 

1-5)사용 설정을 누릅니다.


1-6)그 다음으로는 사용자 정보를 만들어야합니다.

다른 글들을 보니 OAuth 클라이언트 ID를 사용해서 인증을 해서 데이터를 갖고오는 경우가 많은데 

저는 간단히 하기 위해 API키만 발급받겠습니다.


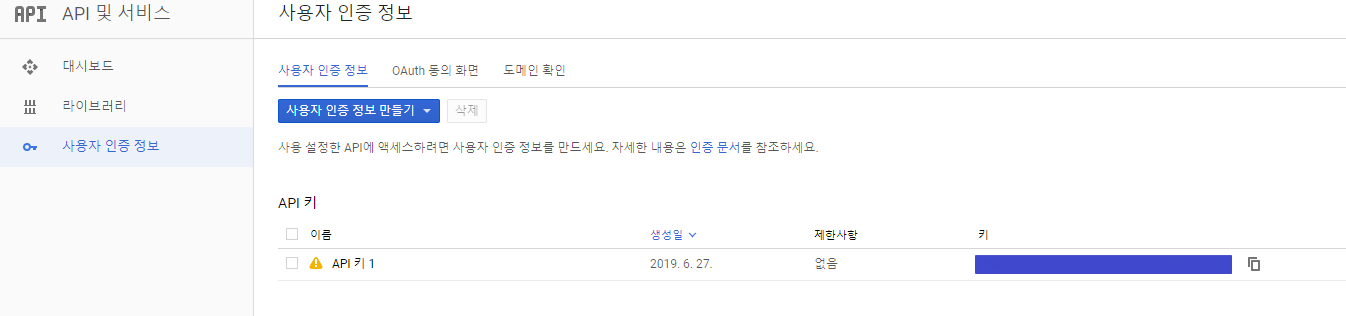
1-7)API 키를 받으시면 아래 화면처럼 나오는데 나중에 API키를 사용할겁니다.


2.유튜브 필요 데이터 얻기


2-1) 유튜브 채널 키 얻기


https://developers.google.com/youtube/v3/docs/channels/list 여기로 접속합니다.


접속하시면 아래로 쭉 내리시면 아래 화면이 나옵니다

2개의 데이터를 넣어주셔야합니다.

-part : contentDetails

-id : 보여줄 유튜브 채널의 id


보여줄 채널에 접속하시면 아래 화면처럼 url에 id가 있습니다.

두개의 데이터를 넣고 아래의 EXECUTE를 눌러주면 아래화면 처럼 나옵니다.

이렇게 데이터가 나오면 uploads의 값을 복사합니다.


그런다음 https://developers.google.com/youtube/v3/docs/playlistItems/list 여기에 접속합니다.


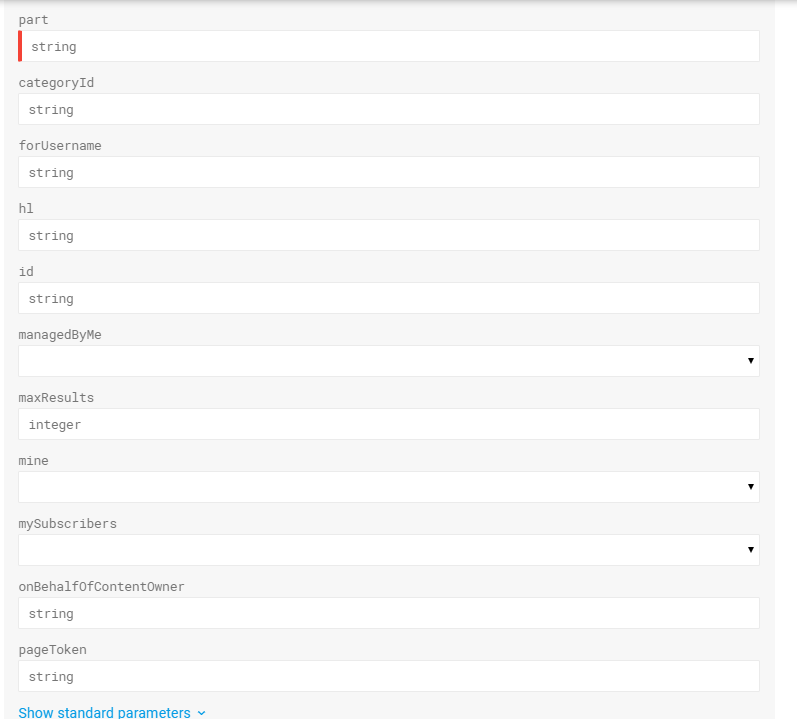
마찬가지로 2개의 데이터를 입력해야합니다.

-part : snippet 

-playlistId : 위에서 얻은 uploads 값을 써줍니다.


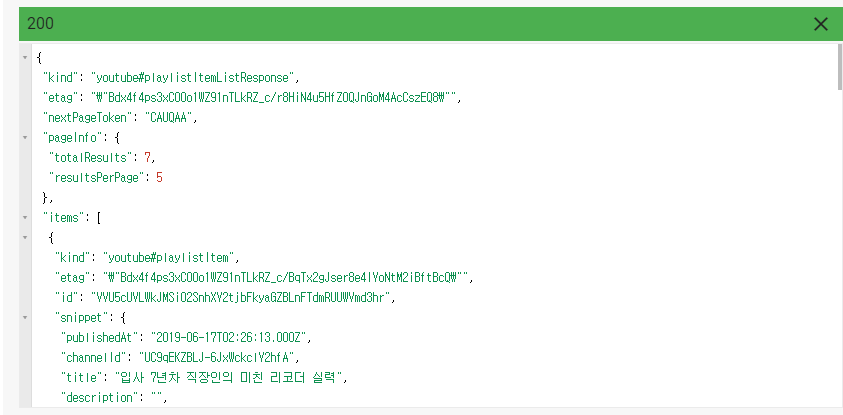
쓰고 EXECUTE 버튼을 누르시면 아래와 같이 채널에 있는 데이터가 나오는걸 확인할수 있습니다.


그럼 이제 아까 얻은 API 키와 playlistId 로 데이터를 호출해보겠습니다.

https://www.googleapis.com/youtube/v3/playlistItemspart=snippet&playlistId={playlistId}&key={API Key}


위에의 URL을 호출하시면 됩니다.


my_upload.js

function GetList() {
    $.ajax({
        url: encodeURI('https://www.googleapis.com/youtube/v3/playlistItems?part=snippet&playlistId=' + playlistId +'&key='+key),
        type: 'Get',
        contentType: "application/json; charset=utf-8",
        success: function (result) {
            $('#video-container').html('');

            var playlistItems = result.items;
            if (playlistItems) {
                $('#listConcent').html('');
                var content = '';
                $.each(playlistItems, function (index, item) {
                    if (index < 4) {
                        var title = item.snippet.title.replace(/"/gi, "'");
                        var videoId = item.snippet.resourceId.videoId;
                        var img = item.snippet.thumbnails.default.url;

                        if (index == 0) {
                            $('#firstTitle').text(title);
                            $('#videoContent').append("<iframe width='380' height='218' src='https://www.youtube.com/embed/" + videoId + "' frameborder='0' allow='accelerometer; autoplay; encrypted-media; gyroscope; picture-in-picture' allowfullscreen></iframe>");
                        }
                        content += "<li class='list' onclick=javascript:ChangeVideo(\"" + title.replace(/ /gi, '&nbsp;') + "\",'" + videoId + "');>";
                        content += "<div class='thumbnail'><a href='#' name='listVideo'><img width='185' height='120' src='" + img + "'></a></div>";
                        content += "<h3 class='list-title'><a href='#' name='listTitle'>" + title + "</a></h3>";
                        content += "</li>";
                        //displayResult(item.snippet);
                    }
                });
                $('#listConcent').append(content);
            } else {
                $('#video-container').html('Sorry you have no uploaded videos');
            }

        },
        error: function (error) {
            //alert(error);
        }
    });
}


function ChangeVideo(title,id) {
    $('#firstTitle').text(title);
    $('#videoContent').html('');
    $('#videoContent').append("<iframe width='380' height='218' src='https://www.youtube.com/embed/" + id + "' frameborder='0' allow='accelerometer; autoplay; encrypted-media; gyroscope; picture-in-picture' allowfullscreen></iframe>");
}


youtube.html

<!doctype html>
<html>
<head>
<meta charset="utf-8">
<title>YouTube</title>
<style>
/*================================================================================

* Reset

=================================================================================*/
html { font-size: 14px; font-weight: 300; letter-spacing: -0.025em;}
body, div, dl, dt, dd, ul, ol, li, h1, h2, h3, h4, h5, h6, pre, code, form, fieldset, legend, textarea, p, blockquote, th, td, input, select, textarea, button { margin: 0; padding: 0; box-sizing: border-box; }
fieldset, img { border: 0 none; }
dl, ul, ol, menu, li { list-style: none; }
blockquote, q { quotes: none; }
blockquote:before, blockquote:after, q:before, q:after { content: ''; content: none; }
input, select, textarea, button { vertical-align: middle; }
input::-ms-clear {
    display:none;
}
input::-webkit-contacts-auto-fill-button {
    visibility:hidden;
    display:none !important;
    pointer-events:none;
    position:absolute;
    right:0;
}
button { border: 0 none; border-radius: 0; background-color: transparent; cursor: pointer; }
body { word-wrap: break-word; word-break: keep-all; }
body, th, td, input, select, textarea, button { font-size: 14px; font-weight: 300; line-height: 1.6; font-family: 'Noto Sans KR', 'Malgun Gothic', '맑은 고딕', 'Apple SD Gothic Neo', '돋움', 'dotum', sans-serif; color: #232323; }
a { color: #232323; text-decoration: none; -webkit-transition: all 0.4s ease-in; transition: all 0.4s ease-in; }
a:active, a:hover, a.line { text-decoration: underline; }
a:active { background-color: transparent; }
address, caption, cite, code, dfn, em, var { font-style: normal; font-weight: 300; }
table { border-collapse: collapse !important; }
html[data-useragent*=mac] body * { font-family: 'Apple SD Gothic NEO', helvetica, sans-serif!important }
::-moz-selection {
    background:#042f6c;
    color:#fff;
}
::selection { background: #042f6c; color: #fff; }
strong, b { font-weight: 600; }
h1, h2, h3, h4, h5 { font-weight: 600; }
figure { margin: 0; }
hr { margin: 10px 0; border: 0; height: 1px; background-color: #e1e1e1; }
.skip { display: none; }
.hide_txt{display:inline-block!important;overflow:hidden!important;position:absolute!important;width:1px;height:1px;margin:0!important;padding:0!important;font-size:1px;line-height:0;clip:rect(1px 1px 1px 1px)}

	.video-wrap { max-width: 380px; margin:  50px auto; }
	.video-wrap .main-video { width: 100%; border-bottom: 1px solid #ddd; }
	.video-wrap .video-stream { width: 100%; height: 218px; background: #333; }
	.video-wrap .video-info { width: 100%; padding: 15px 0; }
	.video-wrap .video-info .main-video-title { width: 100%; min-height: 30px; word-break: break-all; white-space: pre-wrap;  }
	.video-wrap .video-info .main-video-title, .video-wrap .video-list .list-title a { font-size: 1.1rem; color: #111; font-weight: 400; }
	.video-wrap .video-info .main-video-count, .video-wrap .video-list .list-video-count { font-size: 0.9rem; color: #999; }
	.video-wrap .video-list { padding-top: 15px; }
	.video-wrap .video-list .list-wrap:after { display: block; clear: both; content: ''; }
	.video-wrap .video-list .list { width: calc(100%/2); height: 200px; float: left; padding: 15px 0; }
	.video-wrap .video-list .list:nth-child(odd) { padding-right: 5px; }
	.video-wrap .video-list .list:nth-child(even) { padding-left: 5px; }
	.video-wrap .video-list .list .thumbnail { width: 100%; height: 120px; margin-bottom: 8px; background: #333; }
	.video-wrap .video-list .list .list-title { width: 100%; height: 50px; word-break: break-all; white-space: inherit; overflow: hidden;  }
	.video-wrap .video-list .list .list-video-count { margin-top: 5px; }
	
</style>
	
</head>

<body>
    <div class="video-wrap">
        <div class="main-video">
            <div class="video-stream" id="videoContent">
                <!--비디오 영역-->
            </div>
            <div class="video-info" id="videoBody">
                <h2 class="main-video-title" id="firstTitle"></h2>
            </div>
        </div>
        <!-- 비디오 리스트 -->
        <div class="video-list">
            <ul class="list-wrap" id="listConcent" name="listConcent">
               
            </ul>
        </div>

    </div>
    <script src="//ajax.googleapis.com/ajax/libs/jquery/1.8.2/jquery.min.js"></script>
    <script type="text/javascript" src="my_uploads.js"></script>
    <script src="https://apis.google.com/js/client.js?onload=googleApiClientReady"></script>
</body>
</html>


'프로그래밍 > API' 카테고리의 다른 글

[API]구글 로그인 API  (0) 2024.01.26
[API] 네이버 로그인 API 연동  (0) 2024.01.24

function 으로 값을 넘길때 공백으로 인해 오류가 생길경우 아래와 같이 공백을 치환해서 넘겨주면 된다.


function Test1()
{
	var text = "테스트 중 입니다."
    Test2(text.replace(/ /gi, '&nbsp;'));
}

function Test2(text)
{
	console.log(text);
}


replace는 처음 한개만 바꿔주기 때문에 문자열에 있는 모든 공백을 바꿔주기 위해선 gi라는 정규식을 쓰면 됩니다.

'프로그래밍 > JavaScript , jQuery' 카테고리의 다른 글

[JavaScript] var, let, const 차이  (0) 2021.08.23
[JavaScript] 속도 측정  (0) 2021.08.19

+ Recent posts